There are 4 kinds of resources in the game: energy, minerals, power, and commodities. Resources can be harvested, processed, traded on the market, carried by creeps, and stored in structures. All resource kinds have different purposes, and you start playing only with access to the most basic one: energy.
Energy
Where to get: a
Sourcein almost any room.
How to get: send a creep with aWORKpart andharvestit.
Needed for: spawning creeps, building structures.
Energy is the main construction material in the Screeps world. Your base works on energy, so harvesting plenty of it is vital for any colony. You can harvest energy not only in your home room, but also in other rooms remotely to increase energy income.
Minerals
Where to get: a
Mineralin almost any room.
How to get: build aStructureExtractor, send a creep with aWORKpart, andharvestit.
Needed for: boosting creeps' capabilities, and also for producing trade commodities.
By mining and processing minerals, you can significantly speed up your economy and boost the effectiveness of your creeps.
Working with minerals consists of 3 steps:
Harvesting
There are 7 types of base minerals shown in the picture below.
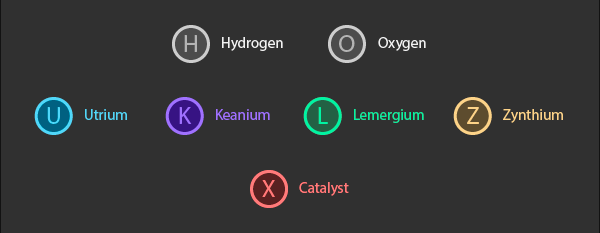
Each room contains only one mineral type, so in order to handle them effectively you need either access to several suitable rooms or trade relationships with other players.
 A mineral deposit is located in a room at a spot marked by a special symbol. To start mining the deposit, you need to construct the special structure Extractor on top of it (available at Room Controller Level 6). Upon building it, you can start applying the method
 harvest to the deposit thus mining the corresponding mineral in the same way you harvest energy.
Mineral compounds
Base minerals are useless on their own. In order to impart some useful capabilities to them, you have to combine them according to special formulas in the structure called Lab.
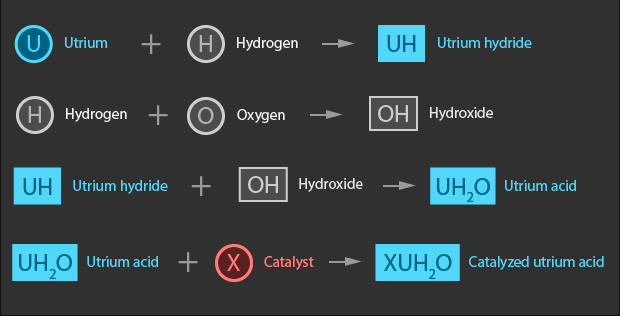
One reaction requires three labs: two as reagent sources, and the third one as the produce collector. The labs should be within the range of 2 squares from each other. One lab cannot contain more than one mineral type at the same time.

var labs = room.find(FIND_MY_STRUCTURES,
    {filter: {structureType: STRUCTURE_LAB}});

labs[0].runReaction(labs[1], labs[2]);

// on the next tick...

console.log(labs[0].mineralType) // -> OH
console.log(labs[1].mineralType) // -> O
console.log(labs[2].mineralType) // -> H
Creep boosts
Apart from running chemical reactions with minerals, a lab can use resulting compounds to permanently upgrade your creeps boosting their specific properties.
Each compound is applied to one body part of the creep of a certain type using the StructureLab.boostCreep method according to the table below and boosts the effectiveness of one of the actions of this creep. The boosted part works as two, three, or even four corresponding parts. To boost the whole creep, you need to boost all its parts of the given type.
Boosting one body part takes 30 mineral compound units and 20 energy units. One body part can be boosted only with one compound type.
| Name | Formula | Time | Body part | Effect |
|---|---|---|---|---|
| Base compounds | ||||
| 20 | — | — | ||
| 5 | — | — | ||
| 5 | — | — | ||
| 5 | — | — | ||
| Tier 1 compounds | ||||
| 10 | ATTACK |
+100% attack effectiveness |
||
| 10 | WORK |
+200% harvest effectiveness |
||
| 10 | CARRY |
+50 capacity | ||
| 10 | RANGED_ATTACK |
+100% rangedAttack and rangedMassAttack effectiveness |
||
| 15 | WORK |
+50% repair and build effectiveness without increasing the energy cost |
||
| 10 | HEAL |
+100% heal and rangedHeal effectiveness |
||
| 20 | WORK |
+100% dismantle effectiveness |
||
| 10 | MOVE |
+100% fatigue decrease speed | ||
| 10 | WORK |
+50% upgradeController effectiveness without increasing the energy cost |
||
| 10 | TOUGH |
-30% damage taken | ||
| Tier 2 compounds | ||||
| 5 | ATTACK |
+200% attack effectiveness |
||
| 5 | WORK |
+400% harvest effectiveness |
||
| 5 | CARRY |
+100 capacity | ||
| 5 | RANGED_ATTACK |
+200% rangedAttack and rangedMassAttack effectiveness |
||
| 10 | WORK |
+80% repair and build effectiveness without increasing the energy cost |
||
| 5 | HEAL |
+200% heal and rangedHeal effectiveness |
||
| 40 | WORK |
+200% dismantle effectiveness |
||
| 5 | MOVE |
+200% fatigue decrease speed | ||
| 15 | WORK |
+80% upgradeController effectiveness without increasing the energy cost |
||
| 30 | TOUGH |
-50% damage taken | ||
| Tier 3 compounds | ||||
| 60 | ATTACK |
+300% attack effectiveness |
||
| 60 | WORK |
+600% harvest effectiveness |
||
| 60 | CARRY |
+150 capacity | ||
| 60 | RANGED_ATTACK |
+300% rangedAttack and rangedMassAttack effectiveness |
||
| 65 | WORK |
+100% repair and build effectiveness without increasing the energy cost |
||
| 60 | HEAL |
+300% heal and rangedHeal effectiveness |
||
| 160 | WORK |
+300% dismantle effectiveness |
||
| 60 | MOVE |
+300% fatigue decrease speed | ||
| 80 | WORK |
+100% upgradeController effectiveness without increasing the energy cost |
||
| 150 | TOUGH |
-70% damage taken | ||
Commodities
Where to get: a
Depositin "highway" rooms.
How to get: send a creep with aWORKpart andharvestit.
Needed for: producing trade commodities and earning credits.
Trade commodities are resources that NPC market traders are most interested in. These resources have no other purpose other than to be sold and generate credits. Producing high-level commodities is the most profitable business in the game.
Harvesting
You harvest raw commodities from a Deposit in "highway" rooms that divide living sectors on the map.
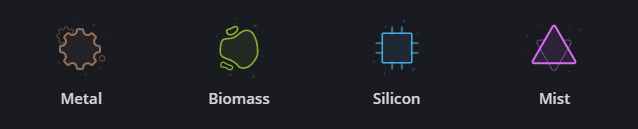
There are 4 types of raw resources: Metal, Silicon, Biomass, Mist.
They are distributed unevenly across the world map: one resource type per map quadrant (NW, NE, SW, SE).
Unlike minerals, these deposits exhaust as you harvest them: the more you harvest, the longer cooldown becomes. They vanish when you stop harvesting it after some time, and reappear elsewhere nearby. Also, a new deposit will appear in the sector if all other deposits are exhausted below some level.
Basic commodities
Selling raw resources may be not very profitable.
This is why it's a better idea to build a Factory (available at RCL 7) in order to produce more complex commodities.
A newly built factory has no level which means it can produce just a few basic commodities out of all kinds of existing resources ("any level" tier in the tables below). They also can be used to store resources in a "compressed" form.

| Product | Factory | Components | Cooldown |
|---|---|---|---|
| Any level | 20 ticks | ||
| Any level | 20 ticks | ||
| Any level | 20 ticks | ||
| Any level | 20 ticks | ||
| Any level | 20 ticks | ||
| Any level | 20 ticks | ||
| Any level | 20 ticks | ||
| Any level | 20 ticks | ||
| Any level | 10 ticks |
You can decompress to recover raw resources when you need them.

| Product | Factory | Components | Cooldown |
|---|---|---|---|
| Any level | 20 ticks | ||
| Any level | 20 ticks | ||
| Any level | 20 ticks | ||
| Any level | 20 ticks | ||
| Any level | 20 ticks | ||
| Any level | 20 ticks | ||
| Any level | 20 ticks | ||
| Any level | 20 ticks | ||
| Any level | 10 ticks |
When you gain access to regional deposit resources, you can start producing additional basic commodities from them.

| Product | Factory | Components | Cooldown |
|---|---|---|---|
| Any level | 8 ticks | ||
| Any level | 8 ticks | ||
| Any level | 8 ticks | ||
| Any level | 8 ticks |
All commodities above can be produced in a factory of any level.
Higher commodities
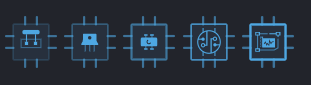
The full use of factories is possible with Operators only, and their OPERATE_FACTORY power.
When an Operator uses this power on a factory without a level, the level of the factory is permanently set to the level of the power, and the same effect is applied on the factory.
It enables the factory to produce commodities of the corresponding level.
The factory can only produce commodities of exactly the same level, or "any level" commodities.
Once set, the factory level cannot be changed.
When the effect duration ends, the factory simply becomes inactive, but its level remains the same ("any level" commodities are still available though).
You need an Operator with the same power level to reactivate it again.
Another level cannot be applied, the only way to change the factory level is to rebuild it.
Each of high-level commodities requires lower level commodities to be produced which forms production chains. There are four production chains, one for each of new resource types: Mechanical (consumes Metal), Electronical (consumes Silicon), Biological (consumes Biomass), and Mystical (consumes Mist), as well as common components. These commodities have the most lucrative prices on the market.

| Product | Factory | Components | Cooldown |
|---|---|---|---|
| Lvl 1 | 50 ticks | ||
| Lvl 2 | 21 ticks | ||
| Lvl 3 | 60 ticks |

| Product | Factory | Components | Cooldown |
|---|---|---|---|
| Lvl 1 | 45 ticks | ||
| Lvl 2 | 115 ticks | ||
| Lvl 3 | 125 ticks | ||
| Lvl 4 | 800 ticks | ||
| Lvl 5 | 600 ticks |

| Product | Factory | Components | Cooldown |
|---|---|---|---|
| Lvl 1 | 35 ticks | ||
| Lvl 2 | 164 ticks | ||
| Lvl 3 | 250 ticks | ||
| Lvl 4 | 800 ticks | ||
| Lvl 5 | 600 ticks |
| Product | Factory | Components | Cooldown |
|---|---|---|---|
| Lvl 1 | 70 ticks | ||
| Lvl 2 | 59 ticks | ||
| Lvl 3 | 250 ticks | ||
| Lvl 4 | 800 ticks | ||
| Lvl 5 | 600 ticks |

| Product | Factory | Components | Cooldown |
|---|---|---|---|
| Lvl 1 | 41 ticks | ||
| Lvl 2 | 128 ticks | ||
| Lvl 3 | 200 ticks | ||
| Lvl 4 | 800 ticks | ||
| Lvl 5 | 600 ticks |
Power
Where to get: a
StructurePowerBankin "highway" rooms.
How to get: destroy the structure and loot the dropped resource.
Needed for: creating Power Creeps.
See this article for more info: Power.